I’m such a kid at Christmas (Ok, some may say I’m such a kid other days as well), but Christmas through the eyes of a child is SO much fun!
One of my fondest memories of the Christmas season is the advent calendar. I couldn’t wait for December 1st to roll around because that meant that my mom would give us our chocolate advent calendars. You know the cardboard ones with the little doors that hide a little piece of chocolate? In hindsight, the chocolate didn’t taste that great, but the excitement of opening that little door and scooping out my little chocolate shape while also getting one day closer to Christmas, made it all worth while!
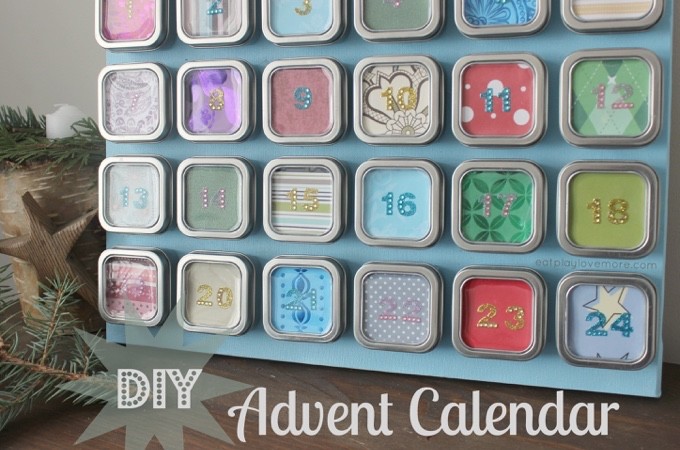
Nowadays, there is no way I would ever allow my children to eat the chocolate out of one of those chocolate calendars, yet there is no way I would rob them of the excitement of the countdown to Christmas. Hence, I have created my own version of an Advent Calendar that allows me to choose what goes behind each door. The kids are so excited to awake and peek behind the window of the corresponding date, it really warms my heart. I know, I know, I’m starting to sound like my mother, but I’m serious. I love experiencing the joy and excitement of children as they count down to Christmas.
If you’re feeling a little crafty (I promise, that’s about the only level of craftiness you will need), then get started on this beautiful DIY Advent Calendar that you will keep for years!
You will need the following:
1 12×16 stretched artists canvas (like this one)
non toxic acrylic paint of your preferred color
24 favor tins (these are the ones I used but I used a 40% off coupon from Michaels)
Strong adhesive (I used this one)
Patterned craft paper
self adhesive number stickers (I used 3/4″ height)
2 inch square paper punch
1. Paint canvas in whatever color you fancy. I made each of mine a variation of light blues.
2. While that dries, punch 24 squares from your assortment of craft paper.
3. Layout paper squares in the color and pattern order you wish and adhere appropriate number stickers to each square. Set aside.
4. Once canvas is dry, lay out tins. I left about a 1/2′ border on the left and right but arrange them however you please. Be sure to leave at least enough space between them for the lids to be easily removed. Remove lids and set them aside.
5. Working row by row, adhere the tins to the canvas. Put a small dallop of glue in the center of the bottom of each tin, being careful not to be so generous that it oozes out the sides once pressed onto the canvas. Allow the tins to dry overnight.
6. Using the same adhesive, carefully put a drop on each corner of numbered paper squares and lay each face down into the lid of each square being certain to press down each corner. Allow to dry overnight.
7. The next day, return lids to tins and admire your work. 🙂
